검색결과 리스트
분류 전체보기에 해당되는 글 12건
- 2020.10.11 [안드로이드] TTS (TextToSpeech) 예제
- 2020.09.14 [Kotlin] DataClass
- 2020.09.13 [Kotlin] 클래스 정리
- 2020.09.13 [Kotlin] 제어문 for , forEach , range , repeat , when
- 2020.09.13 [Kotlin] let 과 also , Elvis 연산자 와 Null 값 필터링
- 2020.09.13 [Kotlin] Array 배열
- 2020.09.13 [Kotlin] String 문자열
- 2020.08.02 [iOS] - UITextView
- 2020.08.02 [iOS] - UILabel
- 2020.08.01 [iOS] - SnapKit : Layout 정리
- 2020.08.01 [iOS] - CocoaPods(코코아팟), Xcode의 Library 관리
- 2020.07.31 [iOS] - Storyboard와 SwiftUI 없이 Project 만들기
글
[안드로이드] TTS (TextToSpeech) 예제
1. TTS Class 소스 (커스텀)
class TTS_Module {
    companion object : TextToSpeech.OnInitListener {
        private const val TTS_DATA_CHECK_CODE = 7200
        private var ctx : Activity? = null
        private var TTS: TextToSpeech? = null
        private var text: String = ""
        private var locale: Locale = Locale.KOREA
        private var level: Float = PITCH.NOMAL.level
        private var speed: Float = SPEED.s1_0X.speed

        fun toSpeech(ctx: Activity, text: String ,
                     locale: Locale? = Locale.KOREA,
                     level: Float = PITCH.NOMAL.level,
                     speed: Float = SPEED.s1_0X.speed){
            this.text = text
            this.ctx = ctx
            if (locale != null) this.locale = locale
            if (level != null) this.level = level
            if (speed != null) this.speed = speed

            if(TTS == null) {
                val intent = Intent()
                intent.action = TextToSpeech.Engine.ACTION_CHECK_TTS_DATA
                ctx.startActivityForResult(intent, TTS_DATA_CHECK_CODE)
            }else{
                speeach()
            }
        }

        private fun speeach(){

            setLanguage(this.locale)
            setPitch(this.level)
            setSpeechRate(this.speed)
			// 블루투스 연결시 패이드인으로 앞에 소리가 살짝 끊김을 해소 하기 위해
            // 무은 MP3 를 재생 후 TTS 작동. (MP3는 0.5~1초 정도가 적당해 보임)
            val resID: Int = ctx!!.resources.getIdentifier(
            	"no_sound", "raw", ctx!!.packageName)
            val player: MediaPlayer = MediaPlayer.create(ctx, resID)
            player.setOnCompletionListener {
                Log.d("B-Rain", "TTS 시작")
                if (Build.VERSION.SDK_INT > Build.VERSION_CODES.LOLLIPOP) {
                    TTS!!.speak("", TextToSpeech.QUEUE_FLUSH, null, null)
                    TTS!!.speak(text, TextToSpeech.QUEUE_ADD, null, null)
                } else {
                    TTS!!.speak("", TextToSpeech.QUEUE_FLUSH, null)
                    TTS!!.speak(text, TextToSpeech.QUEUE_ADD, null)
                }
            }
            player.start()
            Log.d("B-Rain", "무음 MP3 시작")
        }

        override fun onInit(status: Int) {
            if (status == TextToSpeech.SUCCESS) {
                if (TTS!!.isLanguageAvailable(Locale.KOREA) >=
                    TextToSpeech.LANG_AVAILABLE) {
                    TTS!!.language = Locale.KOREA

                    speeach()
                }
            }
        }

        /** 음성 언어 */
        fun setLanguage(locale: Locale? = Locale.KOREA) {
            if (TTS != null) TTS!!.language = locale
        }

        /** 음성 속도 */
        fun setSpeechRate(speed: Float = SPEED.s1_0X.speed) {
            if (TTS != null) TTS!!.setSpeechRate(speed)
        }

        /** 음성 톤 */
        fun setPitch(level: Float = PITCH.NOMAL.level) {
            if (TTS != null) TTS!!.setPitch(level)
        }

        fun onActivityResult(requestCode: Int, resultCode: Int, data: Intent?) {
            if (requestCode === TTS_DATA_CHECK_CODE) {
                if (resultCode === TextToSpeech.Engine.CHECK_VOICE_DATA_PASS) {
                    if(TTS == null) {
                        TTS = TextToSpeech(ctx, this)
                    }else{
                        speeach()
                    }

                } else {
                    val installIntent = Intent()
                    installIntent.action =
                    TextToSpeech.Engine.ACTION_INSTALL_TTS_DATA
                    ctx!!.startActivity(installIntent)
                }
            }
        }

        fun onPause() {
            if (TTS != null) {
                if (TTS!!.isSpeaking) {
                    TTS!!.stop()
                }
            }
        }

        fun onDestroy() {
            if (TTS != null) {
                if(TTS!!.isSpeaking) {
                    TTS!!.stop();
                }
                TTS!!.shutdown();
            }
        }
    }
}

enum class PITCH {
    ROW {
        override fun index() = 1
        override val level: Float
            get() = 0.1F
    },
    NOMAL {
        override fun index() = 2
        override val level: Float
            get() = 1.0F
    },
    HIGH {
        override fun index() = 3
        override val level: Float
            get() = 2.0F
    };

    abstract fun index() : Int
    abstract val level : Float
}

enum class SPEED {
    ZERO {
        override fun index() = 1
        override val speed: Float
            get() = 0.1F
    },
    s1_0X {
        override fun index() = 2
        override val speed: Float
            get() = 1.0F
    },
    s1_5X {
        override fun index() = 3
        override val speed: Float
            get() = 1.5F
    },
    s2_0X {
        override fun index() = 4
        override val speed: Float
        get() = 2.0F
    };

    abstract fun index() : Int
    abstract val speed : Float
}
2. 사용법
- Base Activity로 만들어서 상속 시켜 사용 하면 적당 할 듯.
class BaseActivity : AppCompatActivity() {

    override fun onCreate(savedInstanceState: Bundle?) {
        super.onCreate(savedInstanceState)
        setContentView(R.layout.activity_main)

        btn_tts.setOnClickListener {
        	// TTS_Module 실행 (SingleTone Clas)
            TTS_Module.toSpeech(
                this,
                "TTS 출력 시킴"
            ,Locale.KOREA      // 옵션
            ,PITCH.NOMAL.level // 옵션
            ,SPEED.s1_0X.speed // 옵션
            )
        }
    }

    override fun onActivityResult(requestCode: Int, resultCode: Int, data: Intent?) {
        super.onActivityResult(requestCode, resultCode, data)
		// TTS 데이터 가 없을 경우 "TTS_Module" 클래스가 처리 할 수 있도록 전달
        TTS_Module.onActivityResult(requestCode, resultCode, data)
    }

    override fun onPause() {
        super.onPause()
        // Pause 일 때
        TTS_Module.onPause()
    }
    override fun onDestroy() {
        super.onDestroy()
		// Destroy 일 때
        TTS_Module.onDestroy();
    }
}
'Android (Kotlin)' 카테고리의 다른 글
| [Kotlin] DataClass (0) | 2020.09.14 |
|---|---|
| [Kotlin] 클래스 정리 (0) | 2020.09.13 |
| [Kotlin] 제어문 for , forEach , range , repeat , when (0) | 2020.09.13 |
| [Kotlin] let 과 also , Elvis 연산자 와 Null 값 필터링 (0) | 2020.09.13 |
| [Kotlin] Array 배열 (0) | 2020.09.13 |
글
[Kotlin] DataClass
1. 데이터 클래스 기능
equals()
hashCode()
toString()
componentN()
copy()

data class Book(
	var name: String,
    var authorName: String = "dudu",
    var lastModified: Long = 1234567,
    var rating: Float = 5f,
    var downloads: Int = 1000
    )

fun main(args: Array<String>) {
	var book = Book("Android tutorials","Hup..", 1234567, 4.5f, 1000)

    	book = Book("Kotlin")
    	book = Book("Swift",downloads = 500)
    	book = Book("Java","zzz",rating = 5f, downloads = 1000)
    	book = Book("Python","YYY",rating = 5f)
        println(book.toString())
    val newBook = book.copy(name = "iOS dev")
    println("Hashcode is ${newBook.hashCode()}")
    if(!newBook.equals(book))
        println("newBook and book are NOT equal")

    println(book.component1()) //Python
    println(book.component2()) //YYY
    println(book.component3()) //1234567
    println(book.component4()) //5f
    println(book.component5()) //1000
}
// 변수 이름을 사용하면 원하는 값만 선택적으로 입력 가능 하다.
// toString()함수는 클래스의 값을 출력 한다.
// copy() 는 원하는 값만 변경하여 새로운 val 객채를 만들 수 있다.
// hashCode() 헤시코드를 반환 함.
// equals() " == " 과 같음.
// omponent(n) 생성자에 명시된 순서(n)에 맞는 개체로 접근
2. Destructuring
data class Book(val name: String, val authorName: String = "kaka", val lastModified: Long = 1234567, val rating: Float = 5f, val downloads: Int = 1000)

 val book = Book("Android tutorials","dudu", 1234567, 4.5f, 1000)
 val (n,a,date,rating,downloads) = book

 ==>
 n = "Android tutorials"
 a = "dudu"
 date = 1234566
 rating = 4.5f
 downloads = 1000
equals()
hashCode()
toString()
componentN()
copy()
'Android (Kotlin)' 카테고리의 다른 글
| [안드로이드] TTS (TextToSpeech) 예제 (0) | 2020.10.11 |
|---|---|
| [Kotlin] 클래스 정리 (0) | 2020.09.13 |
| [Kotlin] 제어문 for , forEach , range , repeat , when (0) | 2020.09.13 |
| [Kotlin] let 과 also , Elvis 연산자 와 Null 값 필터링 (0) | 2020.09.13 |
| [Kotlin] Array 배열 (0) | 2020.09.13 |
글
[Kotlin] 클래스 정리
Class 기본 사용
class User {

    var loggedIn: Boolean = false
    val cantChangeValue = "Hi"

    fun logOn() {
        loggedIn = true
    }

    fun logOff() {
        loggedIn = false
    }
}

fun main(args: Array<String>) {

    val user = User()
    println(user.loggedIn) //false
    user.logOn()
    println(user.loggedIn) //true
    user.logOff()
    println(user.loggedIn) //false
    user.cantChangeValue = "Hey" //won't compile. Can't modify a final variable.

}
Class 생성자 "init"
예 1.) =============================

class MultiInit(name: String) {

    init {
        println("First initializer block that prints ${name}")
    }

    init {
        println("Second initializer block that prints ${name.length}")
    }
}

fun main(args: Array<String>) {
    var multiInit = MultiInit("Kotlin")
}

출력>>>>>>>
I/System.out: First initializer block that prints Kotlin
I/System.out: Second initializer block that prints 6


예 2.) ========= With "also"===========

class MultiInit(name: String) {
    val firstProperty = "First property: $name".also(::println)

    init {
        println("First initializer block that prints ${name}")
    }

    val secondProperty = "Second property: ${name.length}".also(::println)

    init {
        println("Second initializer block that prints ${name.length}")
    }
}

fun main(args: Array<String>) {

    var multiInit = MultiInit("Kotlin")
}

출력>>>>>>>
I/System.out: First property: Kotlin
I/System.out: First initializer block that prints Kotlin
I/System.out: Second property: 6
I/System.out: Second initializer block that prints 6
Class 보조 생성자 "constructor"
class Student {
    var name: String
    val age : Int

    constructor(name: String, age: Int)
    {
        this.name = name
        this.age = age
    }

    fun printDetails()
    {
        println("Name is $name and Age is $age")
    }

}

fun main(args: Array<String>) {

    var student = Student("gugu", 17)
    student.printDetails()
}

출력 >>>>>>>>
//Name is gugu and Age is 17
init + constructor
class Student(var name: String, val age: Int) {

    var skill: String

    init {
        skill = "play"
    }

    constructor(name: String, age: Int, skill: String) : this(name, age) {
        this.skill = skill
    }

    fun printDetails() {
        if (skill.equals("play"))
            println("Name is $name and Age is $age")
        else
            println("Name is $name and Age is $age Skill is $skill")
    }
}

I/System.out: Name is no-b-rain and Age is 1
I/System.out: Name is dudu and Age is 20 Skill is dodory
생성자의 인수 , 인수의 기본값 설정
예 1.)
class User(name: String, val isAdmin: Boolean) {

    var username = name     //username = name
    val _isAdmin = isAdmin  //_isAdmin = isAdmin

    init {
        username= username + "https://no-b-rain.tistory.com/"
        println("Author Name is $name. Is Admin? $_isAdmin")
    }
}

fun main(args: Array<String>) {

    var user = User("no-b-rain",false)
    // Error Code : user.isAdmin = true  //won't compile since isAdmin is val
    // Error Code : user._isAdmin = true //won't compile. Same reason.
    user = User("no-Brain",true)
}


예 2.)
class User(name: String, var website: String = "no-b-rain") {

    init {
        println("Author $name writes at $website")
    }

    init {
        website = website + ".com"
        println("Author $name writes at $website")
    }
}

fun main(args: Array<String>) {

    var user = User("no-b-rain","dudu")
    user = User("no-Brain","dudu")
}

I/System.out: Author no-b-rain writes at dudu
I/System.out: Author no-b-rain writes at dudu.com
I/System.out: Author no-Brain writes at dudu
I/System.out: Author no-Brain writes at dudu.com
커스텀 setter , getter
class Name{
    var post: String = "default"
    set(value) {if(!post.isNotEmpty()) {
        throw IllegalArgumentException(" Enter a valid name")
    }
                field = value
    }
    get() {
        return field.capitalize()
    }

}

fun main(args: Array<String>) {

    var name = Name()
    name.post = "kotlin classes"
    println(name.post)
    name.post = "kotlin data Classes our next Tutorial"
    println(name.post)

}
abstract
abstract class Person(name: String) {

    init {
        println("Abstract Class. init block. Person name is $name")
    }

    abstract fun displayAge()
}

class Teacher(name: String): Person(name) {

    var age : Int

    init {
        age = 24
    }

    override fun displayAge() {
        println("Non-abstract class displayAge function overridden. Age is $age")
    }
}

fun main(args: Array<String>) {

    val person = Teacher("Anupam")
    person.displayAge()

}

//Following is printed in the console.
//Abstract Class. init block. Person name is Anupam
//Non-abstract class. Age is 24'Android (Kotlin)' 카테고리의 다른 글
| [안드로이드] TTS (TextToSpeech) 예제 (0) | 2020.10.11 |
|---|---|
| [Kotlin] DataClass (0) | 2020.09.14 |
| [Kotlin] 제어문 for , forEach , range , repeat , when (0) | 2020.09.13 |
| [Kotlin] let 과 also , Elvis 연산자 와 Null 값 필터링 (0) | 2020.09.13 |
| [Kotlin] Array 배열 (0) | 2020.09.13 |
글
[Kotlin] 제어문 for , forEach , range , repeat , when
for in
예 1.) ===============================================
for (i in 0..5) {
    print(i)
}

예 2.) ===============================================
val items = listOf(10, 20, 30, 40)

    for (i in items)
        println("value is $i")

//Following is printed to the console.
value is 10
value is 20
value is 30
value is 40

예 3. index 출력 "indices" ============================
val items = listOf(10, 20, 30, 40)

    for (i in items.indices)
        println("value is $i")

//Following is printed to the console:
value is 0
value is 1
value is 2
value is 3

예 4.) index 와 element 출력 "withIndex()" =============
val items = listOf(10, 20, 30, 40)

    for ((i,e) in items.withIndex())
        println("the index is $i and the element is $e")

//Following is printed on the console:
the index is 0 and the element is 10
the index is 1 and the element is 20
the index is 2 and the element is 30
the index is 3 and the element is 40
forEach [ Range " .. 연산자 " ]
(2..5).forEach{
        println(it)
    }

//or

(2..5).forEach{
      i ->  println(i)
    }

//Following is printed on the console:
2
3
4
5
존재 여부 " in , !in"
var x = 5

    if(x in 1..10)
    {
        print("x exists in range") //this gets printed
    }
    else{
        print("x does not exist in range")
    }

x = 15

    if(x !in 1..10)
    {
        print("x does not exist in range") //this gets printed
    }
    else{
        print("x does exist in range")
    }
Range ..는 역순으로 사용할 수 없음. --> 10..0 처럼 거꾸로 사용 못함.
여기에서 downTo키워드를 사용
var x = 5

    if(x in 10 downTo 1)
    {
        print("x exists in range") //this gets printed
    }
    else{
        print("x does not exist in range")
    }

for (i in 5 downTo 0)
print(i) //543210
마지막 요소를 제외 "until"
for (i in 1 until 4) {
     print(i)
}
//prints 123
단계적으로 범위를 탐색 "step"
for (i in 1..5 step 3) print(i) // prints 14

for (i in 4 downTo 1 step 2) print(i) // prints 42
N번 반복 실행 "repeat"
repeat(3) {
        println("Hello World!")
        println("Kotlin Control Flow")
    }
선택, 분기분 "when"
예 1.)
var num = 10
    when (num) {
        0 -> print("value is 0")
        5 -> print("value is 5")
        else -> {
            print("value is neither 0 nor 5") //this gets printed.
        }
    }

예 2.) until
var valueLessThan100 = when(101){
        in 1 until 101 -> true
        else -> {
            false
        }
    }

    print(valueLessThan100) //false
제어문 for , forEach , range , repeat , when
'Android (Kotlin)' 카테고리의 다른 글
| [Kotlin] DataClass (0) | 2020.09.14 |
|---|---|
| [Kotlin] 클래스 정리 (0) | 2020.09.13 |
| [Kotlin] let 과 also , Elvis 연산자 와 Null 값 필터링 (0) | 2020.09.13 |
| [Kotlin] Array 배열 (0) | 2020.09.13 |
| [Kotlin] String 문자열 (0) | 2020.09.13 |
글
[Kotlin] let 과 also , Elvis 연산자 와 Null 값 필터링
Let function은 아래와 같이 참조가 nullable이 아닌 경우에만 지정된 람다 함수를 실행
newString = " Kotlin from Android"
newString?.let { println("The string value is: $it") }
newString = null
newString?.let { println("The string value is: $it") }
also 사용
var c = "Hello"

        var newString = "chenge string."
        newString?.let { c = it }.also {
            println("Logging the value: $it")
        }
        Log.d("TAG",c)

   -->   "chenge string."
Elvis 연산자 : Elvis 연산자를 ?:사용하면 아래와 같이 null 대신 기본값을 설정할 수 있다.
var newString : String?  = "JournalDev.com"
println(newString?.length) //prints 14
newString = null
println(newString?.length?:"-1") //prints -1
Null value filter
var array2: Array<Any?> = arrayOf("1", "2", "3", null)
var newArray = array2.filterNotNull()
println(newArray.size) //prints
'Android (Kotlin)' 카테고리의 다른 글
| [Kotlin] DataClass (0) | 2020.09.14 |
|---|---|
| [Kotlin] 클래스 정리 (0) | 2020.09.13 |
| [Kotlin] 제어문 for , forEach , range , repeat , when (0) | 2020.09.13 |
| [Kotlin] Array 배열 (0) | 2020.09.13 |
| [Kotlin] String 문자열 (0) | 2020.09.13 |
글
[Kotlin] Array 배열
배열 기본 선언
val abcArray = arrayOf("A","B","C","D","E")
val tmpArray = arrayOf("A",1,1L,1.2,false)
배열 접근
val array1 = arrayOf(1,2,3,4)
val array3 = arrayOf<Long>(1,2,3,4)

array3.get(0)
array3[0]

array1[1] = 6
array1.set(1,6)

println("Size is ${array1.size}") //Size is 4
배열 특정 로직 반복
val array = Array(6) {i-> "Hi "+i}

for(element in array)
println(element)

//prints the following in the console
Hi 0
Hi 1
Hi 2
Hi 3
Hi 4
Hi 5
배열 반전 반환
var array1 = arrayOf(1,2,3,4)
array1 = array1.reversedArray()
    for(element in array1)
    {
        println(element)
    }
//Prints 4,3,2,1
배열 반전 - 변수 자체 반전 변경
var array1 = arrayOf(1,2,3,4)
array1.reverse()
    for(element in array1)
    {
        println(element)
    }
//prints 4,3,2,1
배열 합
var array1 = arrayOf(1,2,3,4)
println(array1.sum()) //prints 10
배열 추가
var array1 = arrayOf(1,2,3,4)
array1 = array1.plus(5)
//or
array1 = array1.plusElement(5)
    for(element in array1)
    {
        println(element)
    }
//prints 1,2,3,4,5
배열 값 체우기( 범위 지정 )
var array1 = arrayOf(1,2,3,4)
array1.fill(0,0,array1.size)
    for(element in array1)
    {
        println(element)
    }
//prints 0,0,0,0,0
배열에 배열 추가
var oldArray = Array(6, {i->i*10})
array1.fill(0,0,array1.size)
array1 = array1.plus(oldArray)

    for(element in array1)
    {
        println(element)
    }
'Android (Kotlin)' 카테고리의 다른 글
| [Kotlin] DataClass (0) | 2020.09.14 |
|---|---|
| [Kotlin] 클래스 정리 (0) | 2020.09.13 |
| [Kotlin] 제어문 for , forEach , range , repeat , when (0) | 2020.09.13 |
| [Kotlin] let 과 also , Elvis 연산자 와 Null 값 필터링 (0) | 2020.09.13 |
| [Kotlin] String 문자열 (0) | 2020.09.13 |
글
[Kotlin] String 문자열
문자열 기본
var str: String  = "Hello"

//or
var str = "Hello"

var newString: String = 'A' //ERROR
var newString: String = 2 //ERROR
문자열 합치기 기본
var str  = "Hello"
str += "Kotlin Strings"
빈문자열
var s = String() //creates an empty string.문자열 길이
val str = "Hello Kotlin Strings"
println(str.length) //prints 20
특정 위치 문자 반환
val str = "Hello Kotlin Strings"
println(str.get(0)) //print 'H'
println(str.subSequence(0,5)) //prints Hell
문자열 비교
var str  = "Hello Kotlin Strings"
var s = String()
s = "Hello KOTLIN Strings"
println(s.compareTo(str)) //prints -32
println(s.compareTo(str,true)) //prints 0
문자열 이스케이프 문자
- \n 개행.
- \r 캐리지 리턴.
- \t 탭.
- \b 역행 키이
- \" 큰 따옴표
- \' 작은 따옴표
- \\ 백 슬래시
- \$ 달러 – 문자열 주입
var len = str.length
var newStr = "Length of str is ${str.length}"
//or
var newStr = "Length of str is $len"

println(Length of str is ${str.length})
Raw 문자열 (여러줄)
var rawString = """Hi How you're Doing
        I'm doing fine\n.
        I owe you $5.50"""
    print(rawString)

//prints the following
Hi How you're Doing
        I'm doing fine\n. /** \n 은 소용 없음. **/
        I owe you $5.50
Raw 문자열 (여러줄) - 줄바꿈
var rawString = """Hi How you're Doing
        |I'm doing fine.
        |I owe you $5.50""".trimMargin("|")
    print(rawString)
//Prints the following to the console.

Hi How you're Doing
I'm doing fine.
I owe you $5.50
String override
class Student(var name: String, var age: Int)
{

    override fun toString(): String {
        return "Student name is $name and age is $age"
    }
}

//The following code is written inside the main function of the Kotlin class.
var student = Student("Banana", 16)
print(student) //prints Student name is Banana and age is 16
비교 연산
- Reference Equality === : 두 개체의 포인터가 동일한 지 확인
- Structural Equality == : 두 객체의 내용이 동일한 지 확인
'Android (Kotlin)' 카테고리의 다른 글
| [Kotlin] DataClass (0) | 2020.09.14 |
|---|---|
| [Kotlin] 클래스 정리 (0) | 2020.09.13 |
| [Kotlin] 제어문 for , forEach , range , repeat , when (0) | 2020.09.13 |
| [Kotlin] let 과 also , Elvis 연산자 와 Null 값 필터링 (0) | 2020.09.13 |
| [Kotlin] Array 배열 (0) | 2020.09.13 |
글
[iOS] - UITextView
- UITextView 내용 정리
- Snapkit으로 ui-component들을 배치합니다.
- SnapKit의 기본 지식은 2020/08/01 - [iOS] - iOS - SnapKit : Layout 정리를 참고.
import Foundation
import SnapKit


class TestUITextViewVC: UIViewController {
    lazy var noB_TextView : UITextView = {
        let value : UITextView = UITextView()

        value.backgroundColor = UIColor.cyan
        value.text = "안녕하세요 No.B.Rain 입니다.
                      지금 여기는
                      https://no-b-rain.tistory.com/ 입니다."
        value.textColor = UIColor.red
        // 그림자를 넣고 싶다면 아래와 같이 농도를 설정
        value.layer.shadowOpacity = 0.5
        // Text 정렬 (왼쪽)
        value.textAlignment = NSTextAlignment.left
        value.font = UIFont.systemFont(ofSize: CGFloat(20))
                   //UIFont.systemFont(ofSize: UIFont.buttonFontSize)
                   //UIFont.systemFont(ofSize: UIFont.systemFontSize)
                   //UIFont.boldSystemFont(ofSize: UIFont.systemFontSize)
                   //UIFont.italicSystemFont(ofSize: UIFont.systemFontSize)

        value.layer.masksToBounds = true
        //value.layer.cornerRadius = "높이" * 0.05
        //(둥근 모서리는 생성될 때 높이 값을 주입해서 설정)

        // 테두리 설정
        value.layer.borderWidth = 1
        value.layer.borderColor = UIColor.black.cgColor

        // 자동 URL 유형 처리
        value.dataDetectorTypes = UIDataDetectorTypes.all
                                //UIDataDetectorTypes.address
                                //UIDataDetectorTypes.calendarEvent
                                //UIDataDetectorTypes.phoneNumber
                                //UIDataDetectorTypes.link
                                //UIDataDetectorTypes.flightNumber
        // 편집 모드에서는 위의 "자동 URL 유형 처리" 기능이 동작하지 않음.
        value.isEditable = false
        return value
    }()

    lazy var noB_Label : UILabel = {
        // Label 생성 => 가로 300 , 세로 300
        let value : UILabel = UILabel (frame : CGRect (x: 0 , y: 0 , width: 300 , height: 100 ))

        value.backgroundColor = UIColor.black
        value.text = "No.B.Rain 노비의 문서"
        value.textColor = UIColor.yellow
        // Text 정렬 (중앙)
        value.textAlignment = NSTextAlignment.center

        // 둥근 모서리 => 둥근 모서리는 컨탠츠 높이의 5%가 가장 적당하고 이쁨(개인적으로..)
        value.layer.masksToBounds = true
        value.layer.cornerRadius = 150 * 0.05

        // 그림자
        value.shadowColor = UIColor.black
        return value
    }()

    override func viewDidLoad() {
        super.viewDidLoad()

        //UILabel를 view에 추가
        self.view.addSubview(noB_Label)
        //UITextView를 view에 추가
        self.view.addSubview(noB_TextView)


        //화면 중앙 배치
        noB_Label.snp.makeConstraints { (constraint) in
            constraint.center.equalTo(self.view)
        }


        let nH : CGFloat = noB_Label.frame.height
        noB_TextView.snp.makeConstraints { (constraint) in
            //noB_TextView의 top 위치를 noB_Label의 bottom dp margine 50을 설정
            constraint.top.equalTo(noB_Label.snp_bottomMargin).offset(50)
            //noB_TextView의 좌/우측 기준을 noB_Label보다 +/-50으로 설정
            constraint.left.equalTo(noB_Label.snp_leftMargin).offset(-50)
            constraint.right.equalTo(noB_Label.snp_rightMargin).offset(50)

            //noB_TextView의 넓이를 noB_Label의 넓이와 동일 하도록.
            /** constraint.width.equalTo(noB_Label) **/
            //noB_TextView의 높이를 100으로 설정
            constraint.height.equalTo(nH)
        }

        //둥근 모서리
        noB_TextView.layer.cornerRadius = nH * 0.05
    }

    override func viewWillAppear(_ animated: Bool) {
        super.viewWillAppear(animated)
    }
}
'iOS' 카테고리의 다른 글
| [iOS] - UILabel (0) | 2020.08.02 |
|---|---|
| [iOS] - SnapKit : Layout 정리 (0) | 2020.08.01 |
| [iOS] - CocoaPods(코코아팟), Xcode의 Library 관리 (0) | 2020.08.01 |
| [iOS] - Storyboard와 SwiftUI 없이 Project 만들기 (0) | 2020.07.31 |
글
[iOS] - UILabel
- UILabel 내용 정리
- Snapkit으로 ui-component들을 배치합니다.
- SnapKit의 기본 지식은 2020/08/01 - [iOS] - iOS - SnapKit : Layout 정리를 참고.
import Foundation
import SnapKit

class TestUILabelVC: UIViewController {

   lazy var noB_Label : UILabel = {
        // Label 생성 => 가로 300 , 세로 300
        let lbl : UILabel = UILabel (frame : CGRect (x: 0 , y: 0 , width: 300 , height: 300 ))

        lbl.backgroundColor = UIColor.black
        lbl.text = "No.B.Rain 노비의 문서"
        lbl.textColor = UIColor.yellow
        // Text 정렬 (중앙)
        lbl.textAlignment = NSTextAlignment.center

        // 둥근 모서리 => 둥근 모서리는 컨탠츠 높이의 5%가 가장 적당하고 이쁨(개인적으로..)
        lbl.layer.masksToBounds = true
        lbl.layer.cornerRadius = 150 * 0.05

        // 그림자
        lbl.shadowColor = UIColor.black
        return lbl
    }()


    override func viewDidLoad() {
        super.viewDidLoad()

        //UILabel 화면에 추가
        self.view.addSubview(noB_Label)

        //화면 중앙 배치
        noB_Label.snp.makeConstraints { (constraint) in
            constraint.center.equalTo(self.view)
        }
    }
}

'iOS' 카테고리의 다른 글
| [iOS] - UITextView (0) | 2020.08.02 |
|---|---|
| [iOS] - SnapKit : Layout 정리 (0) | 2020.08.01 |
| [iOS] - CocoaPods(코코아팟), Xcode의 Library 관리 (0) | 2020.08.01 |
| [iOS] - Storyboard와 SwiftUI 없이 Project 만들기 (0) | 2020.07.31 |
글
[iOS] - SnapKit : Layout 정리
● Subject : Auto Layout apply using the Snapkit library
- To do
- SnapKit을 사용하여 아주 간단한 화면 배치를 해볼 것입니다.
- Safe Area 영역 구성
- SnapKit 화면 구성 팁
- SnapKit - 기본 구성
import UIKit
import SnapKit
class MyMainView: UIViewController {
lazy var myButtonCenter: UIButton = {
let btn = UIButton()
btn.setTitle("My Button(C) ", for: .normal)
btn.backgroundColor = UIColor.red
return btn
}()
lazy var myButtonTop: UIButton = {
let btn = UIButton()
btn.setTitle("My Button(T)", for: .normal)
btn.backgroundColor = UIColor.blue
return btn
}()
lazy var myButtonLeft: UIButton = {
let btn = UIButton()
btn.setTitle("My Button(L)", for: .normal)
btn.backgroundColor = UIColor.green
return btn
}()
lazy var myButtonRight: UIButton = {
let btn = UIButton()
btn.setTitle("My Button(R)", for: .normal)
btn.backgroundColor = UIColor.yellow
return btn
}()
lazy var myButtonBottom: UIButton = {
let btn = UIButton()
btn.setTitle("My Button(B)", for: .normal)
btn.backgroundColor = UIColor.cyan
return btn
}()
override func viewDidLoad() {
super.viewDidLoad()
view.addSubview(myButtonCenter)
view.addSubview(myButtonTop)
view.addSubview(myButtonBottom)
view.addSubview(myButtonLeft)
view.addSubview(myButtonRight)
myButtonCenter.snp.makeConstraints { (make) in
make.center.equalTo(view)
}
myButtonTop.snp.makeConstraints { (make) in
make.top.centerX.equalTo(view)
}
myButtonBottom.snp.makeConstraints { (make) in
make.bottom.centerX.equalTo(view)
}
myButtonLeft.snp.makeConstraints { (make) in
make.left.centerY.equalTo(view)
}
myButtonRight.snp.makeConstraints { (make) in
make.right.centerY.equalTo(view)
}
}
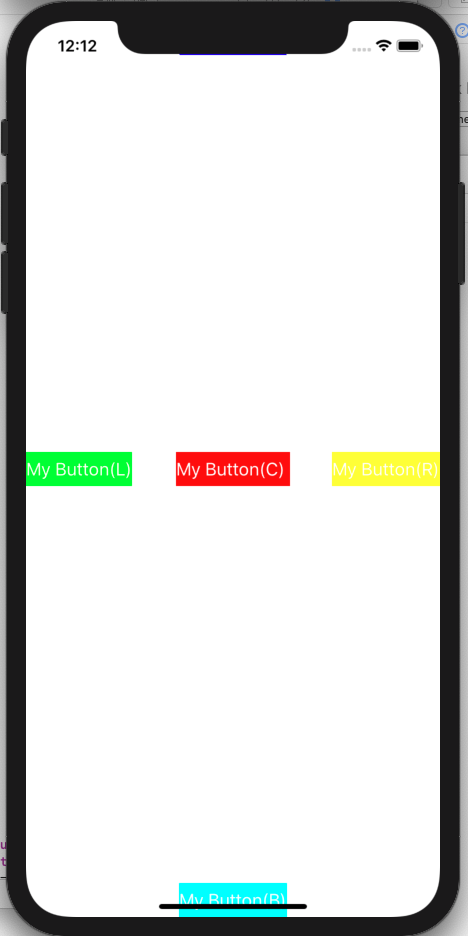
}- 실행화면.
- SnapKit - safe area 영역
import UIKit
import SnapKit
import Foundation
class MyMainView: UIViewController {
let safetyArea: UIView = {
let v = UIView()
v.backgroundColor = .black
return v
}()
lazy var myButtonCenter: UIButton = {
let btn = UIButton()
btn.setTitle("My Button(C) ", for: .normal)
btn.backgroundColor = UIColor.red
return btn
}()
lazy var myButtonTop: UIButton = {
let btn = UIButton()
btn.setTitle("My Button(T)", for: .normal)
btn.backgroundColor = UIColor.blue
return btn
}()
lazy var myButtonLeft: UIButton = {
let btn = UIButton()
btn.setTitle("My Button(L)", for: .normal)
btn.backgroundColor = UIColor.green
return btn
}()
lazy var myButtonRight: UIButton = {
let btn = UIButton()
btn.setTitle("My Button(R)", for: .normal)
btn.backgroundColor = UIColor.yellow
return btn
}()
lazy var myButtonBottom: UIButton = {
let btn = UIButton()
btn.setTitle("My Button(B)", for: .normal)
btn.backgroundColor = UIColor.cyan
return btn
}()
override func viewDidLoad() {
super.viewDidLoad()
setBaseView()
setView()
}
func setBaseView(){
safetyArea.translatesAutoresizingMaskIntoConstraints = false
view.addSubview(safetyArea)
if #available(iOS 11, *) {
let guide = view.safeAreaLayoutGuide
safetyArea.topAnchor.constraint(equalTo: guide.topAnchor).isActive = true
safetyArea.bottomAnchor.constraint(equalTo: guide.bottomAnchor).isActive = true
safetyArea.leadingAnchor.constraint(equalTo: guide.leadingAnchor).isActive = true
safetyArea.trailingAnchor.constraint(equalTo: guide.trailingAnchor).isActive = true
} else {
safetyArea.topAnchor.constraint(equalTo: topLayoutGuide.topAnchor).isActive = true
safetyArea.bottomAnchor.constraint(equalTo: bottomLayoutGuide.bottomAnchor).isActive = true
safetyArea.leadingAnchor.constraint(equalTo: view.leadingAnchor).isActive = true
safetyArea.trailingAnchor.constraint(equalTo: view.trailingAnchor).isActive = true
}
}
func setView() {
safetyArea.addSubview(myButtonCenter)
safetyArea.addSubview(myButtonTop)
safetyArea.addSubview(myButtonBottom)
safetyArea.addSubview(myButtonLeft)
safetyArea.addSubview(myButtonRight)
myButtonCenter.snp.makeConstraints { (make) in
make.center.equalTo(safetyArea)
}
myButtonTop.snp.makeConstraints { (make) in
make.top.centerX.equalTo(safetyArea)
}
myButtonBottom.snp.makeConstraints { (make) in
make.bottom.centerX.equalTo(safetyArea)
}
myButtonLeft.snp.makeConstraints { (make) in
make.left.centerY.equalTo(safetyArea)
}
myButtonRight.snp.makeConstraints { (make) in
make.right.centerY.equalTo(safetyArea)
}
}
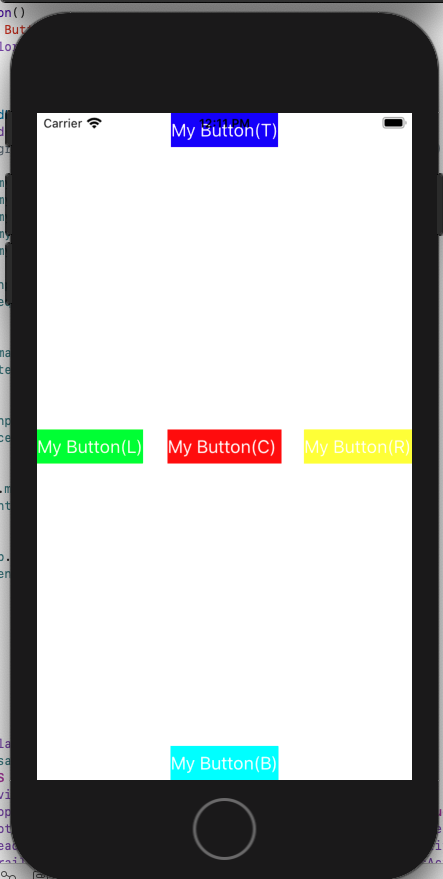
}- 실행화면
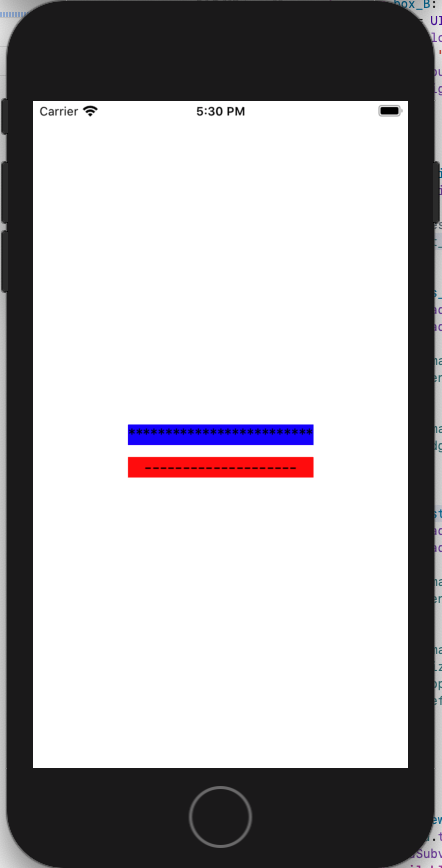
- SnapKit 화면 구성 팁
/*** 화면에 표현할 UILabel 2개 준비 ***/
lazy var box_A: UILabel = {
let lbl = UILabel()
lbl.textColor = .black
lbl.text = "*************************"
lbl.backgroundColor = .blue
lbl.textAlignment = .center
return lbl
}()
lazy var box_B: UILabel = {
let lbl = UILabel()
lbl.textColor = .black
lbl.text = "--------------------"
lbl.backgroundColor = .red
lbl.textAlignment = .center
return lbl
}()
/*** 기준(box_A)에 의해 (box_B)를 크기및 위치 조정 ***/
func test_adjust_size() {
self.view.addSubview(box_A)
self.view.addSubview(box_B)
box_A.snp.makeConstraints { (make) in
make.center.equalTo(self.view)
}
box_B.snp.makeConstraints { (make) in
make.size.equalTo(box_A)
make.top.equalTo(box_A.snp_bottomMargin).offset(20)
make.left.equalTo(box_A)
}
}
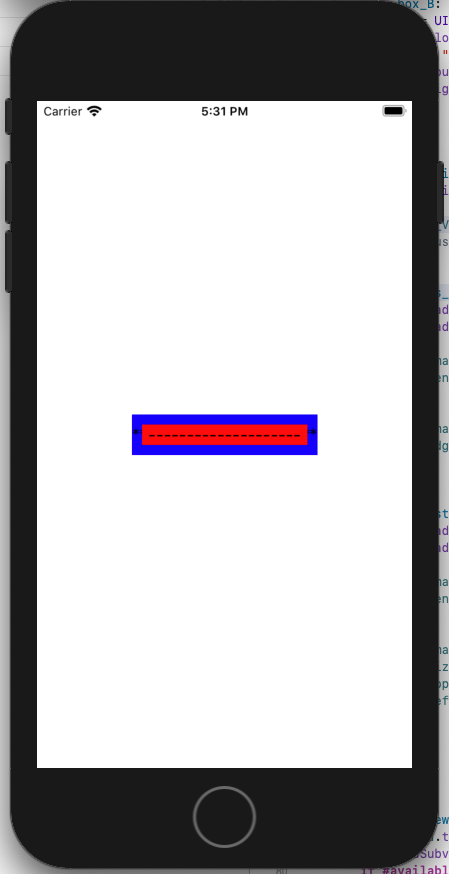
/*** edge test ***/
func test_edges_View() {
self.view.addSubview(box_A)
self.view.addSubview(box_B)
box_A.snp.makeConstraints { (make) in
make.center.equalTo(self.view)
}
box_B.snp.makeConstraints { (make) in
make.edges.equalTo(box_A)
.inset(UIEdgeInsets(top: 10,left: 10,bottom: 10,right: 10))
}
} 
유용한 function
!! snp.updateConstraints : Constraint를 업데이트할 필요가 있을 때
!! snp.remakeConstraints: Constraint를 지우고 다시 설정
'iOS' 카테고리의 다른 글
| [iOS] - UITextView (0) | 2020.08.02 |
|---|---|
| [iOS] - UILabel (0) | 2020.08.02 |
| [iOS] - CocoaPods(코코아팟), Xcode의 Library 관리 (0) | 2020.08.01 |
| [iOS] - Storyboard와 SwiftUI 없이 Project 만들기 (0) | 2020.07.31 |
글
[iOS] - CocoaPods(코코아팟), Xcode의 Library 관리
● 주제 : CocoaPods가 무엇인지 알고, 사용법을 익힙니다.
- 할 일
- CocoaPods 이란?
- Cocoapods 사용법.
- 내용
- CocoaPods 이란? - https://cocoapods.org/ 에 가서 보면 "WHAT IS COCOAPODS"에 간단명료하게 설명을 합니다. CocoaPods는 Swift와 Objective-C Cocoa Project의 dependency를 management 하는 기능을 하며, 아주 많은 앱에서 사용 중이고 project의 확장을 아름답게 도와준다고 자랑..... 하고 있습니다. ㅡ_ㅡ;;; 뭐 덧 붙일 내용이 없네요. ㅎㅎ
- Cocoapods 사용법 - cocoapods 설치
$ sudo gem install cocoapods- Cocoapods 사용법 - 사용
순서
1) "Podfile" 을 만들기 위해 프로젝트 폴더로 이동
2) "Podfile" 생성
3) "Podfile" 편집
4) vi 상의 "Podfile" 파일 내용 및 수정
5) "Podfile" 설치
$ cd "my-prject"
$ pod init
$ vi Podfile


# Uncomment the next line to define a global platform for your project
# platform :ios, '9.0'

target '프로젝트 명' do
  # Comment the next line if you don't want to use dynamic frameworks
  use_frameworks!

  ###'아래 부분에 필요한 라이브러리 추가 (SnapKit,AFNetworking,RealmSwift)'
  pod 'SnapKit', '~> 5.0.0'
  pod 'AFNetworking', '~> 3.0'
  pod 'RealmSwift'
  ###'필요한 라이브러리 추가 끝'

  # Pods for 프로젝트 명

  target '프로젝트 명' do
    inherit! :search_paths
    # Pods for testing
  end

  target '프로젝트 명' do
    # Pods for testing
  end

end
** Podfile 편집
###'아래 부분에 필요한 라이브러리 추가 (SnapKit,AFNetworking,RealmSwift)'
pod 'SnapKit', '~> 5.0.0'
pod 'AFNetworking', '~> 3.0'
pod 'RealmSwift'
###'필요한 라이브러리 추가 끝'
** Podfile 설치
$ pod install

** Podfile 적용 후 Xcode loading file : "프로젝트명. xcworkspace" 파일로 프로젝트를 열 수 있습니다.

'iOS' 카테고리의 다른 글
| [iOS] - UITextView (0) | 2020.08.02 |
|---|---|
| [iOS] - UILabel (0) | 2020.08.02 |
| [iOS] - SnapKit : Layout 정리 (0) | 2020.08.01 |
| [iOS] - Storyboard와 SwiftUI 없이 Project 만들기 (0) | 2020.07.31 |
글
[iOS] - Storyboard와 SwiftUI 없이 Project 만들기
● 주제 : Storyboard를 사용하지 않고 소스만으로 프로젝트를 만들어 보려 합니다.
- 왜 Storyboard 없이 소스만으로 프로젝트를 만들려고 할까?
- git과 같은 형상관리 툴을 사용해서 협업을 할 때 심심 찬 게 Storyboard의 영역에서 충돌(conflict)이 발생하고, 이를 해결하기 위한 시간적 비용도 많이 소비됩니다.
- 복잡한 Layout을 표현할 때 소스로 구현하면 제약조건(Constraint)을 쉽게 적용하고 추적할 수가 있습니다. 소스로 구현하다 보면, 자연스럽게 ViewController도 재사용을 하게 되고요.
- 할 일
- 프로젝트 만들기
- sceneDelegate 삭제 (프로젝트에 등록된 정보와 소스파일 삭제)
- 새 ViewController 만들기 ("MyRootView.swift" , "MyRootView.xib" 생성과 두 파일과의 연결)
- AppDelegate 수정 (앱의 기본 화면이 될 "MyRootView"와 UINavigationController를 등록)
- 프로젝트 만들기 - 아래 그림과 같이 User Interface의 값은 "Storyboard"로 설정합니다.

- sceneDelegate 등록 정보 삭제 - "Info.plist"의 Application Scene Manifest" 항목 삭제 -> "-" 버튼 눌러서 프로젝트에 등록된 기본 화면 정보를 삭제합니다.

- sceneDelegate 소스 파일 삭제 - 위 내용에 이어서 실제 "sceneDelegate.swift"파일을 삭제합니다.

- 새 ViewController 만들기 : "MyRootView.swift" - 새 파일 만들기 메뉴 경로 "File -> New -> File..."로 이동하여" "Swift File"을 선택하고, "Next"버튼을 누른 후 "MyRootView.swift 2)"처럼 Save as에 MyRootView와 같이 파일명을 입력 후 "Create" 버튼을 누릅니다.


- 새 ViewController - "MyRootView.swift" 파일 작성
//UIKit 추가
import UIKit

import Foundation

//Class 생성과 UIViewController 상속
class MyRootView: UIViewController {

    //viewDidLoad 오버라이드
    override func viewDidLoad() {
        super.viewDidLoad()

        // 실행시 초록색 화면이 보입니다. (메인화면을 잘 봐꿨는지 확인용.)
        self.view.backgroundColor = UIColor(red: 0, green: 1, blue: 0, alpha: 0.3)
    }
}
- 새 ViewController 만들기 : "MyRootView.xib" - 새 파일 만들기 메뉴 경로 "File -> New -> File..."로 이동하여" "View"를 선택하고, "Next"버튼을 누른 후 "MyRootView.xib 2)"처럼 Save as에 MyRootView와 같이 파일명을 입력 후 "Create" 버튼을 누릅니다.


- 새 ViewController 만들기 : "MyRootView.xib의 File's Owner의 Custom Class에 MyRootView.swift 연결"


- AppDelegate 수정 - "UISceneSession Lifecycle"의 관련된 내용을 삭제합니다.
- 참고로, SwiftUI는 이전 버전과의 호환성이 없는 문제점이 있습니다. (단지 제 의견이다만,) 시간이 지나고 SwiftUI 가 조금 더 다듬어지고 유연해진다면 SwiftUI는 대중화될 것입니다. 하지만 하위 버전의 호환성을 고려하지 않고 개발하는 경우가 아니면 호환성을 고려해서 SwiftUI를 덜어 내는 것이 정신 건강상 좀 더 좋을 것 같습니다. ^^;
import UIKit

@UIApplicationMain
class AppDelegate: UIResponder, UIApplicationDelegate {

    func application(_ application: UIApplication,
                     didFinishLaunchingWithOptions launchOptions: [UIApplication.LaunchOptionsKey: Any]?) -> Bool {
        // Override point for customization after application launch.
        return true
    }

    /** 여기부터 지움... (UISceneSession 관련 내용)
    // MARK: UISceneSession Lifecycle

    func application(_ application: UIApplication,
                     configurationForConnecting connectingSceneSession: UISceneSession,
                     options: UIScene.ConnectionOptions) ->
                     UISceneConfiguration {
                      // Called when a new scene session is being created.
                      // Use this method to select a configuration to
                      // create the new scene with.
		return UISceneConfiguration(name: "Default Configuration", sessionRole: connectingSceneSession.role)
    }

    func application(_ application: UIApplication,
                     didDiscardSceneSessions sceneSessions: Set<UISceneSession>) {
        // Called when the user discards a scene session.
        // If any sessions were discarded while the application was not running,
        // this will be called shortly after application:didFinishLaunchingWithOptions.
        // Use this method to release any resources that were specific to the discarded scenes,
        // as they will not return.
    }
    여기까지... (UISceneSession 관련 내용)
    */

}- AppDelegate 수정 - MyRootView와 UINavigationController 등록
import UIKit
import Foundation

@UIApplicationMain
class AppDelegate: UIResponder, UIApplicationDelegate {

    // rootViewController에 navigation 을 등록할 UIWindow.
    var window: UIWindow?
    // 화면 이동과 화면 이력을 관리할 UINavigationController 추가.
    var navigation : UINavigationController? = nil
    // 앱이 시작 할 때 보여 줄 기본 화면 (이름을 MyRootView 로 정함.)
    var myRootView : MyRootView!

    func application(_ application: UIApplication,
                     didFinishLaunchingWithOptions launchOptions: [UIApplication.LaunchOptionsKey: Any]?) -> Bool {
        // Override point for customization after application launch.

        // 아래 내용 작성.
        myRootView = MyRootView()
        navigation = UINavigationController.init(rootViewController: myRootView)

        // 상단 네비게이션바 숨김.
        navigation?.setNavigationBarHidden(true,animated: false)
        window = UIWindow(frame: UIScreen.main.bounds)
        window?.rootViewController = navigation

        return true
    }

    /** 여기부터 지움... (UISceneSession 관련 내용)
    // MARK: UISceneSession Lifecycle
- 결과 화면 - 위 MyRootView의 배경색 설정이 적용된 ViewController로 적용이 되어서 실행되는 것을 확인할 수 있습니다.

*^^* 여기까지 읽어주신 독자님께 감사드립니다. iOS 개발을 배워 나가며 쓰는 글입니다. 글의 내용 중 틀린 내용이 있거나 부족한 점 있다면 귀뜸 부탁드립니다.
다음 글은 Snapkit의 project 등록과 사용법 공부해 보겠습니다.
'iOS' 카테고리의 다른 글
| [iOS] - UITextView (0) | 2020.08.02 |
|---|---|
| [iOS] - UILabel (0) | 2020.08.02 |
| [iOS] - SnapKit : Layout 정리 (0) | 2020.08.01 |
| [iOS] - CocoaPods(코코아팟), Xcode의 Library 관리 (0) | 2020.08.01 |